The post 16 Tips for Beautiful Travel Portrait Photography appeared first on Digital Photography School. It was authored by Philipp Dukatz.

This article was updated in January 2024 with contributions from Philipp Dukatz, Ben McKechnie, Oded Wagenstein, Matt Dutile, Darren Rowse, Kevin Landwer-Johan, Suzi Pratt, and Peter West Carey.
Travel portrait photography might seem difficult – but with the right approach, it’s surprisingly easy.
I’ve taken photos of people while traveling all around the world, and in this article, I explain everything you need to know for stunning travel portraiture, including:
- The best ways to approach locals
- A simple trick to set your subjects at ease
- How to choose the right gear
- How to find the best locations
- Much more!
So if you want to become a travel photography master, then let’s dive right in, starting with my first tip:
1. Be ready for beautiful moments

If you’re serious about capturing top-notch travel portraits, then you should be ready to fire the camera shutter at all times.
Travel portraiture is all about shooting the brief moments – the glimpses into a person’s life that aren’t replicable. You’re not doing landscape photography, where you (often) have plenty of time to select a lens, set up your tripod, and choose your settings; instead, you’re doing travel portraits, which require a fast shutter finger and intense mental focus.
That’s why you should constantly scan the environment, looking for potential candid subjects. And even once you’ve found a subject, watch them carefully for a memorable split-second expression.
Also, make sure you take your lens cap off, switch your camera on, adjust your travel settings in advance, and be ready to shoot!

2. Get close to your subject
Do you feel your travel portraits look boring? It’s probably because you are too far away.
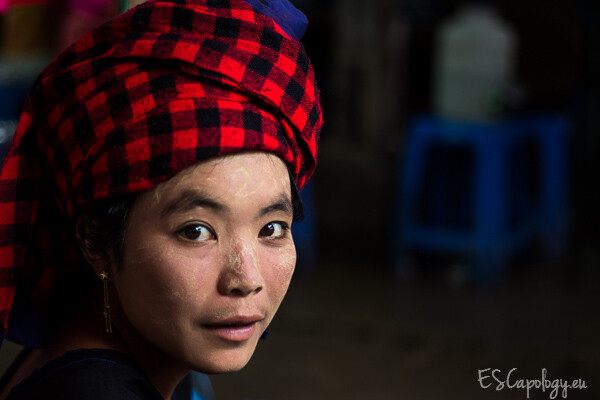
I know it feels awkward to get close to someone you don’t know, especially in a foreign country. It seems so much easier to shoot from a distance and capture a more environmental travel portrait, or to break out that telephoto lens, zoom in, and click away.
Unfortunately, in my experience, this just won’t work.
If you want to capture crisp, sharp, extraordinary images that tell a story and leave your audience stunned, you must overcome your shyness. A close perspective will add more details to your subject’s face; it will also simplify the composition so that you’re focusing on just one or two elements. And by walking in close, you’ll gain control over key items: the lighting, the background, the composition, and the depth of field. These factors are vital in good portrait photography and are so much easier to adjust when you are close to your subject.
How can you get up close without feeling uncomfortable? That’s what I explain in my next few tips:
3. Practice approaching people

It’s the biggest challenge in travel portrait photography: How do you get close to people without bothering them? How do you talk to strangers and ask for permission to take pictures?
My recommendation:
Start by practicing.
Think about what you might say to a person. Write out a script (or three) if you have to. Then practice it in the mirror. Practice smiling, practice gesturing to your camera, and practice saying the script repeatedly until it becomes automatic.
Sure, you might feel a bit silly – but when it comes time to actually approach a person, it’ll be so much easier!
When you’re approaching a person for real, it’s all about your attitude. So make contact, seem upbeat, talk, and – most importantly! – smile.
Bottom line: Don’t be shy, adapt to the local culture, get to know people, make friends, and you will take great pictures.
4. Learn the basics of the local language
You may be wondering:
If I don’t know the local language, then how can I approach people and interact successfully?
It’s simple: Just learn a few basic phrases. These won’t take much effort, but they’ll go a long way to helping you approach people. In my experience, these are the six most important phrases you should learn before traveling to a new country:
- Hello, how are you?
- My name is …?
- I am from …?
- What is your name?
- Thank you!
- Beautiful!
Practice the phrases on bus rides, and ask your hotel receptionist, taxi driver, or local friends how to pronounce words. Don’t be afraid to make mistakes!
Then, when you’re out shooting, go up to people with your camera and use the phrases. Once you’ve gotten acquainted, gesture to your camera – and if you get the nod of approval, take their photo!

5. Smile a lot!
I said it before, but it’s so important that it deserves its own section:
Whatever you do, when you’re approaching strangers, make sure to smile. A smile can go such a long way. If you are grumpy and angry because you’re not getting the shots you want, it’ll put people off. No one will want to go near you, and people definitely won’t want to get their picture taken by you.
If you do it right, when you come home from a photo walk, you’ll have lots of pictures. And your cheeks should hurt from all the smiling!

6. Take your time
Once you’ve made contact with a potential subject, and you’ve established a good vibe, it’s time to take a picture. But don’t rush; that will make your subject uncomfortable, and it won’t make for a good result.
Instead, take advantage of all the “work” you’ve put in and take your time. Be calm, think about the light, think about what you want to emphasize (the eyes, the hands, or the person itself), and think about the background. Take a deep breath and try a couple of shots. Maybe switch angles and test out different compositions.
As you work, your subject will also become more relaxed and get used to the camera. Again, there is no need to rush. In my experience, a slow portrait is nearly always better than a fast one!

7. Don’t be afraid to capture candid portraits
When encountering people who are totally engrossed in what they are doing, it’s best not to interrupt them. Instead, remain separate and capture candid or semi-candid photos.
I rarely hide my camera; instead, I prefer to have it out in the open so people can be aware that I’m taking photos. Most folks pay no attention, especially when you’re in a tourist area.
For this next photo, I wanted to capture the young boy advertising goods at the top of his voice. He and the older man (I assume it was his grandfather that he was helping) were aware of my presence and that I was taking photos. I was able to do so without disrupting the action.

8. Choose a strong composition
Numerous compositions can work for portraits. The rule of thirds can work incredibly well, but don’t overdo it or all your travel portraits will look the same.
Another approach is to place one of your subject’s eyes directly in the center of the frame; a study proved that portraits composed this way appeal to viewers on a subconscious level. (I promise I’m not making that up!) It’s a trick that can be applied in both portrait and landscape orientation.
A general rule exists in travel portraiture that you shouldn’t place your subject directly in the center of the frame. However, rules are made to be broken sometimes!

(Image by Ben McKechnie)
9. Come down to their eye level
Try not to stand above your subject if they are sitting. It’s intimidating and works against your goal to relax the person. Positive psychological things happen when you get down on someone’s eye level. Take a look at the example below:

(Image by Ben McKechnie)
The image was not captured in a touristy location in India, so he is the real deal. I sat down on the step to receive a blessing. Accompanied by mystical chanting, I drank some lukewarm tea of unknown provenance, had air blown all over my face, and ash spread across my forehead. We chatted after, and I felt in no rush to suggest a portrait. It was a fascinating experience. What do you think when you look at his facial expression – is the time spent together palpable?
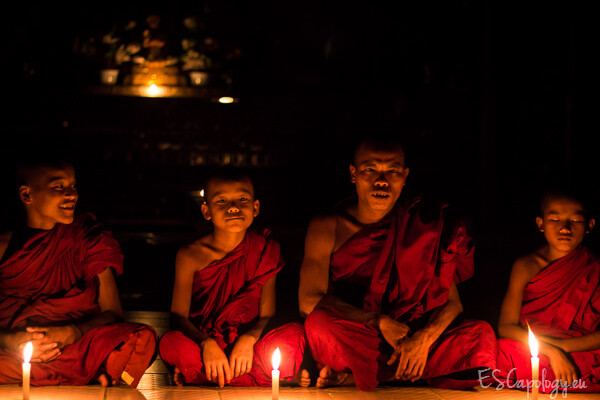
10. Always be aware of the lighting
Light will add feeling to your travel portraits when you use it well. Look at the type of lighting in the location where you’re making your portraits. Is it conducive to the style of the portrait you wish to capture? Do you need to come back at another time of the day or night? Will adding some flash improve the shot?
When you’re traveling, you often can’t wait for the right light, so you must make the best use of available light. When the light at the location is not great, you need to get creative and add illumination – either with a flash or a reflector.
For this night portrait of a Samlor rider, I was able to position him to make the most of the light in the street market behind him. I also used my flash to illuminate him and help catch a glimpse of the motorcycle passing behind.

11. Don’t be afraid to move
Reality can be quite boring, and while there are plenty of great subjects, not all compositions work – so don’t get stuck capturing the same obvious, conventional shots.
Instead, when you approach a new subject, think about all the different crops and angles you might use. Envision a strong image in your head. Then move to make it happen!
In particular, pay attention to your subject’s position in the scene and how they relate to elements in the foreground and the background. You don’t want trees or signs coming out of your subject’s head, and you don’t want any strong splashes of color that will distract the viewer, either.
Fortunately, just by taking a few steps to the right or left, you can often eliminate distractions and/or include additional beautiful elements.
Don’t be lazy! And don’t just rely on your lens’s zoom capabilities. For the best shots, move those feet!

12. Get a 50mm lens
I know, I know: You can take great travel photos with any lens (and any camera, for that matter). However, certain lenses are ideal for certain types of photography, and if you want stunning travel portrait photos, I highly recommend you invest in a 50mm lens.
What makes a 50mm lens so special?
For one, the perspective is very natural and therefore great for portraits. You’ll be able to capture detailed shots without standing too close to your subject, but you’ll also be able to back up for a wider field of view in case you want to take some environmental images.
Plus, a 50mm prime lens will force you to really think about your compositions. You won’t be able to zoom in on your subjects; if you want to get a tight shot, you’ll need to make the deliberate decision to move closer.
Bonus: 50mm lenses are super portable, which means you can carry one all day and you won’t notice the weight.

13. Choose the right settings for travel portraits
With my fixed focal lens, I often shoot portraits at f/2.8 or slightly above. If you shoot any wider, the focal plane can be so thin that you risk your subject’s eyes being in focus but having their nose out of focus. For a zoom lens, I recommend selecting your widest aperture but standing further away from your subject. Zooming in on their face will accentuate the shallow depth of field effect that works so well for portraits.

(Image by Ben McKechnie)
For engaging portraits, the most important element requiring sharp focus is the eyes. I suggest setting your camera to spot focus on the center AF point. Next, aim the center point at one of your subject’s eyes. Use the focus and recompose method – or even better – the back button focus method to lock in on the eyes. This will ensure they’re in sharp focus in the finished photo.
14. Start by shooting kids and people in action
If you’re still feeling a bit uncomfortable about approaching people and asking for a shot, then start out easy:
With kids, and with people in action.
You see, kids are so easy to photograph. They usually love getting their picture taken; they’ll pose for long minutes and never get bored! Of course, be mindful of boundaries, and always ask the parents before shooting their child.
As for capturing people in action:
I’m talking about people who are doing something. For instance, you’ll have an easy time photographing a person playing a musical instrument, whereas a person doing nothing will surely notice your approach. Do you see what I mean? People who are busy with tasks won’t care about you taking pictures, so they’re a great beginner’s subject!
Pro tip: Look for traditional workshops or handicraft businesses. They usually make for great travel portrait opportunities!

15. Shoot a series with the same subject
When you have someone’s permission and have bonded with them, consider staying with them a while and shooting a series of images. This is what I did when I met a man in the Philippines recently. I directed him gently for a series of shots after telling him how interested people would be to learn about his culture. He was happy to oblige.

(Image by Ben McKechnie)

(Image by Ben McKechnie)
16. Get out of the touristy areas
Travel portrait photography is about capturing authentic images that really tell the story of a location.
And you won’t find that story in touristy hubs.
You see, tourist attractions are (usually) far from a country’s reality. Sure, take a few images in the tourist traps, but then move farther afield. Note that getting off the beaten track isn’t as difficult as you might think; sometimes it takes just 15 minutes to find yourself in a small, local village.
And as a photographer, that is where you want to be. You’ll meet real people who aren’t out to sell things. You will have more chances to interact, practice your newly acquired language skills, and take more authentic photographs.
Plus, it’ll make for a much better travel experience than the “Lonely Planet path.”
Travel portrait photography: final words
Capturing great travel portraits takes a little practice.
But it’s worth it.
So don’t be shy; instead, get out that camera, make friends with the locals, and capture some great photos! Take your time, open up, get close, and don’t forget to smile.
Now over to you:
Which of these travel portrait tips do you plan to use on your next trip? Share your thoughts in the comments below!
Table of contents
Travel Photography
-
GENERAL
-
PREPARATION
-
LIGHTING
-
COMPOSITION
-
GEAR
-
ADVANCED GUIDES
-
10 Ways to Improve Your Travel Photography Portraits
- 1. Be ready for beautiful moments
- 2. Get close to your subject
- 3. Practice approaching people
- 4. Learn the basics of the local language
- 5. Smile a lot!
- 6. Take your time
- 7. Don’t be afraid to capture candid portraits
- 8. Choose a strong composition
- 9. Come down to their eye level
- 10. Always be aware of the lighting
- 11. Don’t be afraid to move
- 12. Get a 50mm lens
- 13. Choose the right settings for travel portraits
- 14. Start by shooting kids and people in action
- 15. Shoot a series with the same subject
- 16. Get out of the touristy areas
- Travel portrait photography: final words
-
-
POST-PROCESSING
-
BUSINESS
-
INSPIRATION
The post 16 Tips for Beautiful Travel Portrait Photography appeared first on Digital Photography School. It was authored by Philipp Dukatz.
from Digital Photography School https://ift.tt/U2vJV8y


