Sunday, 4 October 2020

6 Tips for Near-Macro Photography with a Telephoto Lens

The post 6 Tips for Near-Macro Photography with a Telephoto Lens appeared first on Digital Photography School. It was authored by Elliot Hook.

Macro photography is the art of capturing the fine detail of very small subjects that may not be seen by the naked eye. Technically, to fall under the category of “macro,” the subject should be captured with a reproduction ratio of 1:1 (i.e., the subject will be captured on the sensor at 100% life-size).

Macro lenses are specially designed to minimize the focusing distance, allowing the photographer to get closer to the subject and therefore increase the reproduction ratio.

There are a number of techniques that can be used to help achieve the desired magnification without a dedicated lens (extension tubes, close-up filters, and reversing rings). However, one of the less common techniques is to use something that you probably already have in your bag: a telephoto lens.

Milking Bonnet Fungi (Mycena galopus)

Milking Bonnet Fungi (Mycena galopus)

Telephoto lenses offer extreme magnification, but generally have much larger minimum focusing distances. This pushes the photographer farther from the subject and therefore reduces the reproduction ratio. Some telephoto lenses, when combined with camera systems utilizing smaller sensors, are able to offer 1:1 magnification (true macro). However, typically, telephoto lenses are limited to close-up photography at near-macro reproduction ratios.

Using a telephoto lens for this kind of work offers a couple of advantages over a dedicated macro lens that are a direct result of the large minimum focus distance. Because the working distance to the subject is in the region of 1 meter (compared to the 15-30 cm working distance of standard macro lenses), the risk of disturbing your subject as you compose your shot is much reduced.

Also, given the extra distance between the camera and the subject, you are much less likely to cast a shadow over your subject, and you have a lot of freedom with the lighting you can employ to light the subject, both natural and flash.

Common Blue butterflies, mating (Polyommatus icarus)

Common Blue butterflies, mating (Polyommatus icarus)

Using a telephoto lens for such precise work is not without challenge, so here are a few tips to help maximize your chances of getting that near-macro shot with your telephoto lens:

  1. Due to the extreme focal length, the risk of reduced sharpness due to camera shake is higher. Therefore, it is imperative to use a tripod and a remote shutter release to try to limit lens/camera movement.
  2. Even on a tripod, images can still suffer from camera shake. Try to use a tripod collar for your telephoto lens, so that the lens is clamped directly to the tripod, reducing the chances of “lens wobble.” If not, use the “1/focal length’” shutter speed rule to help capture sharp images. (I always use 1/effective focal length, where you multiply your focal length by the sensor crop factor to give the focal length in 35 mm terms.)
  3. Be aware of the depth of field. Using extreme focal lengths at such close distances can reduce the depth of field to fractions of a millimetre. Therefore, to ensure the subject is sharp throughout, use a small enough aperture to ensure the depth of field extends across your whole subject (there are websites and apps to help you do this).
  4. If you want to capture your subject in focus from front to back, ensure that it is parallel to your sensor. The depth of field will be so narrow at the extreme focal lengths that you may not have more than a few millimetres to play with. Therefore, position yourself accordingly to maximize your chances of capturing a sharp image.
  5. If your telephoto lens as an AF/MF switch, switch it to manual focus and compose/focus the shot manually. You may find that, when focusing manually, the minimum focusing distance decreases, meaning that you can get closer to your subject, increasing the magnification.
  6. Use a teleconverter to increase the focal length, but retain the same minimum focusing distance. This will allow you to significantly increase the magnification of the subject, without having to move any further away. Increasing the focal length in this way will have consequences on your choice of shutter speed and aperture, but as long as it is taken into consideration, a teleconverter can successfully be used to increase the reproduction ratio.
Common Blue Damselfly (Enallagma cyathigerum)

Common Blue Damselfly (Enallagma cyathigerum)

Using a telephoto lens for near-macro photography will typically not allow you to magnify your subject as far as if you were using a dedicated macro lens, but you will be able to test the water to see if macro photography is something you enjoy without having to splash out on any additional kit.

If you do decide that macro photography is for you, by putting this technique into practice, you will learn a lot of good fieldcraft that will be beneficial when you get around to picking up that new macro lens.

The post 6 Tips for Near-Macro Photography with a Telephoto Lens appeared first on Digital Photography School. It was authored by Elliot Hook.


from Digital Photography School https://ift.tt/36uUO0Z

Saturday, 3 October 2020

Wedding Photography – 21 Tips for Amateur Wedding Photographers

The post Wedding Photography – 21 Tips for Amateur Wedding Photographers appeared first on Digital Photography School. It was authored by Darren Rowse.

Wedding Photography Tips

“Help me, I’m photographing my first wedding! Give me some wedding photography tips, please!”

It’s a question that photographers frequently ask. So while I’m not a pro wedding photographer, I thought it was time to share a few tips on the topic of wedding photography.

I’ll leave the technical tips for photographing a wedding to the pros. But, as someone who has been asked to photograph numerous friends’ and family’s weddings, here are a few suggestions.

1. Create a shot list

Wedding Photography Shot List

One of the most helpful tips I’ve been given regarding wedding photography is to get the couple to think ahead about the shots that they’d like you to capture on the day.

Then compile a list so that you can check each shot off. This is particularly helpful in family shots. There’s nothing worse than getting the photos back and realizing you didn’t photograph the happy couple with Grandma!

2. Wedding photography family photo coordinator

I find that the family photo part of the day can be quite stressful. People are going everywhere, you’re unaware of the different family dynamics at play, and people are in a “festive spirit” (and have often been drinking a few spirits) to the point that it can be quite chaotic.

Get the couple to nominate a family member (or one for each side of the family) who can be the “director” of the shoot. They can round everyone up, help get them in the shot, and keep things moving so that the couple can get back to the party.

Wedding Photography Tips

3. Scout the location

Visit the locations of the different places that you’ll be shooting before the big day.

While I’m sure most pros don’t do this, I find it really helpful to know where we’re going, to have an idea of a few positions for shots, and to know how the light might come into play. Before one or two weddings, I’ve even visited locations with the couples and took a few test shots (these made nice “engagement photos”).

4. In wedding photography, preparation is key

So much can go wrong on the day, so you need to be well-prepared. Have a backup plan (in case of bad weather), have batteries charged, memory cards blank, think about routes and times to get to places. Get an itinerary of the full day so you know what’s happening next. If you can, attend the rehearsal of the ceremony, where you’ll gather a lot of great information about possible positions to shoot from, the lighting, the order of the ceremony, etc.

5. Set expectations with the couple

Show the couple your work/style. Find out what they want to achieve, how many shots they want, what key things they want to be recorded, how the shots will be used (for prints, etc.). If you’re charging them for the event, make sure you have the agreement of price in place upfront.

6. Turn off the sound on your camera

Beeps during speeches, the kiss, and vows don’t add to the event. Switch off your camera sounds beforehand and keep them off.

Wedding Photography

7. Shoot the small details

Photograph rings, backs of dresses, shoes, flowers, table settings, menus, etc. These help give the end album an extra dimension. Flick through a wedding magazine at a newsstand for a little inspiration.

8. Use two cameras

Beg, borrow, hire, or steal an extra camera for the day, and set it up with a different lens. I try to shoot with one wide-angle lens (great for candid shots and in tight spaces, particularly before the ceremony in the preparation stage of the day) and one longer lens (it can be handy to have something as large as 200mm if you can get your hands on one; I use a 70-200mm).

9. Consider a second wedding photographer

Having a second photographer can be a great strategy. It means less moving around during ceremony and speeches, and it allows for one photographer to capture the formal shots while the other gets candid shots. It also takes a little pressure off you as “the one” who has to get every shot!

10. Be bold but not obtrusive

Wedding Photography Tutorial

Timidity won’t get you “the shot,” so sometimes you need to be bold to capture a moment.

However, timing is everything, and thinking ahead to get in the right position for key moments is important so as not to disrupt the event.

In a ceremony, I try to move around at least 4-5 times, but I try to time my move to coincide with songs, sermons, or longer readings. During the formal shots, be bold, know what you want, and ask for it from the couple and their party. You’re driving the show at this point of the day and need to keep things moving.

11. Learn how to use diffused light

The ability to bounce a flash or to diffuse it is key. You’ll find in many churches that light is very low. If you’re allowed to use a flash (and some churches don’t allow it), think about whether bouncing the flash will work (remember that if you bounce your flash off a colored surface it will add a color cast to the picture), or whether you might want to buy a flash diffuser to soften the light.

If you can’t use a flash, you’ll need to use a fast lens at wide apertures and/or bump up the ISO. A lens with image stabilization might also help. Learn more about using flash diffusers and reflectors.

12. Shoot in RAW

I know that many readers feel that they don’t have the time for shooting in RAW (due to extra processing), but a wedding is one time that it can be particularly useful, as RAW gives so much more flexibility to manipulate shots after taking them. Weddings can present photographers with tricky lighting that results in the need to manipulate exposure and white balance after the fact, and RAW will help with this considerably.

Wedding Photography

13. Display your shots at the reception

One of the great things about digital photography is the immediacy of it as a medium. One of the fun things I’ve seen more and more photographers doing recently is taking a computer to the reception, uploading shots taken earlier in the day, and letting them rotate as a slideshow during the evening. This adds a fun element to the night.

14. Consider your backgrounds

One of the challenges of weddings is that there are often people going everywhere, including the backgrounds of your shots. Particularly with the formal shots, scope out the area where they’ll be taken ahead of time and look for good backgrounds.

Ideally, you’ll want uncluttered areas and shaded spots out of direct sunlight where there’s unlikely to be a great aunt wandering into the back of the shot. Read more on getting backgrounds right.

15. Don’t discard your “mistakes”

The temptation with digital is to check images as you go and to delete those that don’t work immediately. The problem with this is that you might just be getting rid of some of the more interesting and useable images. Keep in mind that images can be cropped or manipulated later to give you some more artsy/abstract looking shots that can add real interest to the end album.

Wedding Photography picture

16. Change your perspective

Get a little creative with your shots. While the majority of the images in the end album will probably be fairly “normal” or formal poses, make sure you mix things up a little by taking shots from down low, up high, at a wide angle, etc.

17. Wedding group shots

One thing I’ve done at every wedding I’ve photographed is attempted to photograph everyone who is in attendance in one shot. The way I’ve done this is to arrange for a place that I can get up high above everyone straight after the ceremony. This might mean getting a tall ladder, using a balcony, or even climbing on a roof. The beauty of getting up high is that you include everyone’s face, and you can fit a lot of people in a single shot.

The key is to quickly be able to get everyone to the place you want them to stand, and to be ready to get the shot without having everyone stand around for too long. I’ve found that the best way to get everyone to the spot is to get the bride and groom there and to have a couple of helpers herd everyone in that direction. Read more on how to take group photos.

18. Fill flash

When shooting outside after a ceremony or during the posed shots, you’ll probably want to keep your flash attached to give a little fill flash. I tend to dial the flash back a little (a stop or two) so that shots are not blown out. But, particularly in backlit or midday shooting conditions where there can be a lot of shadow, fill flash is a must. Read more about using fill flash.

19. Continuous shooting mode

Having the ability to shoot a lot of images fast is very handy on a wedding day, so switch your camera to its continuous shooting mode and use it. Sometimes it’s the shot you take a second after the formal or posed shot when everyone is relaxing that really captures the moment!

Wedding Photography Rain

20. Expect the unexpected

One more piece of advice that someone gave me on my own wedding day: “Things will go wrong, but they can be the best parts of the day.”

In every wedding that I’ve participated in, something tends to go wrong with the day. The best man can’t find the ring, the rain pours down just as the ceremony ends, the groom forgets to do up his fly, the flower girl decides to sit down in the middle of the aisle, or the bride can’t remember her vows.

These moments can feel a little panicky at the time. But it’s these moments that can actually make a day and give the bride and groom memories. Attempt to capture them, and you could end up with some fun images that sum up the day really well.

I still remember the first wedding I photographed, where the bride and groom’s car crashed into a tram on the way to the park where we were going to take photos. The bride was in tears, the groom stressed out. But after we’d all calmed down, people began to see some of the funny side of the moment, and we even took a couple of shots before driving on to the park. They were among everyone’s favorites.

21. Have fun

Weddings are about celebrating; they should be fun. The more fun you have as the photographer, the more relaxed those you are photographing will be. Perhaps the best way to loosen people up is to smile as the photographer (warning: I always come home from photographing weddings with sore jaws and cheeks because of my smiling strategy).

The post Wedding Photography – 21 Tips for Amateur Wedding Photographers appeared first on Digital Photography School. It was authored by Darren Rowse.


from Digital Photography School https://ift.tt/2r1kwC7

Friday, 2 October 2020

Weekly Photography Challenge – Minimalism

The post Weekly Photography Challenge – Minimalism appeared first on Digital Photography School. It was authored by Sime.

From a recent dPS article by one of our authors, Simon Bond, we’re going to revisit ‘Photographic Minimalism’ (Don’t worry, it’s easy and fun!)

What is minimalism?

Minimalism, as the name suggests, is about keeping things simple. It means avoiding clutter, which in photography equates to removing unwanted elements from your photos.

You do want a main subject, though; this is needed for the minimalist parts of your photos to have something to contrast with. Make sure you tag your photo #dPSMinimalism wherever you choose to share it!

photographic minimalism fisherman example
Shooting upward toward the fisherman helped produce a minimalist photo.

Or maybe a ship on the horizon? Whatever your photograph might be, do your best to show us that photographic minimalism! (Bit confused, check out this article)

Weekly Photography Challenge - Minimalism

Great! Where do I upload my photos?

Simply upload your shot into the comments field (look for the little camera icon in the Disqus comments section) and they’ll get embedded for us all to see. Or, if you’d prefer, upload them to your favourite photo-sharing site and leave the link to them.

Weekly Photography Challenge – Looking Up

Share in the dPS Facebook Group

You can also share your images in the dPS Facebook group as the challenge is posted there each week as well.

If you tag your photos on Flickr, Instagram, Twitter or other sites – tag them as #DPSMinimalism to help others find them. Linking back to this page might also help others know what you’re doing so that they can share in the fun.

Follow us on Instagram?

The post Weekly Photography Challenge – Minimalism appeared first on Digital Photography School. It was authored by Sime.


from Digital Photography School https://ift.tt/36pIgbe

Nikon Z6 II and Z7 II to Launch on October 14th

The post Nikon Z6 II and Z7 II to Launch on October 14th appeared first on Digital Photography School. It was authored by Jaymes Dempsey.

Nikon Z6 Z7 II launch

Almost exactly two years after the launch of Nikon’s full-frame mirrorless system, it’s time for an update:

The Z6 II and the Z7 II, officially launching on October 14th.

If you want to know precisely when the new models will be announced, you can view a countdown on the Nikon USA website, here.

Nikon Z6 Z7 II launch

Unfortunately, Nikon didn’t release any product specifications or extra information to go along with the announcement, other than the title, “The Next Chapter.” But Nikon Rumors has been publishing on Nikon Z6 II and Z7 II specifications for months, which is why we know a lot more about these two cameras than you might expect.

First, as is now clear from the titles, the Z6 II and the Z7 II will offer enhancements on the existing Z6 and Z7 models, Nikon’s first two mirrorless cameras. Both the Z6 and Z7 debuted back in late 2018 to general praise, which means that the Z6 II and the Z7 II, regardless of any major upgrades or innovations, should be formidable cameras.

In fact, it’s looking like Nikon will take a relatively laid-back approach to these successor models.

Nikon Rumors reports that the new cameras will be an “incremental update to the current Z6/Z7 models;” they’ll feature the same sensors as their predecessors (24 MP and 45.7 MP, respectively), the same electronic viewfinder resolution (3.69M-dot), and similar designs.

On the other hand, the Z6 II and the Z7 II should come with plenty of useful upgrades, including:

  • Dual card slots
  • 4K/60p video capabilities
  • Next-level autofocus
  • Enhanced continuous shooting capabilities (with a larger buffer and speedier shooting)

Interestingly, Nikon Rumors also claims that the Z6 II will be “the last Nikon camera with a 24 MP sensor.” Assuming this rumor is correct, it begs the question: Where does Nikon plan to go after this? Perhaps we’ll see a shift to 26 MP sensors, 30 MP sensors, or even a drop back to 20 MP sensors, but I have a hard time believing the change will be any more drastic.

After all, there are several reasons that camera manufacturers stick with lower megapixel counts on some of their cameras (despite their ability to manufacturer 50+ megapixel sensors). For instance, a 45 MP camera will struggle to go toe-to-toe with a 24 MP camera in low light, which is why we’re still getting a 12 MP sensor on the Sony a7S III and a 20 MP sensor on the Canon 1D X Mark III.

Like the Nikon Z6 and Z7, you can expect that the Z6 II and Z7 II will cater to professionals and other experienced photographers. So if you’re interested in a top-notch full-frame camera, one with dual card slots and plenty of other great features, then take a look at these new models!

Now over to you:

What do you think of the Nikon Z6 II and Z7 II? Were you hoping for more significant upgrades? Or are you looking forward to these new models? Share your thoughts in the comments!

The post Nikon Z6 II and Z7 II to Launch on October 14th appeared first on Digital Photography School. It was authored by Jaymes Dempsey.


from Digital Photography School https://ift.tt/3cSzXpK

Thursday, 1 October 2020

Save 88% on 200 Photography Assignments that Inspire, Motivate and Teach

The post Save 88% on 200 Photography Assignments that Inspire, Motivate and Teach appeared first on Digital Photography School. It was authored by Darren Rowse.

If you learn more efficiently (and have more fun with your photography) when you’re out shooting versus sitting somewhere reading about it, then this photography learning aid was designed for YOU.

One of the most popular photography training aids we’ve ever promoted have been the Snap Cards and Action Cards from Photzy – thousands of dPS readers have enjoyed these in the past. If you’re new to dPS or missed out last time, then you’re in luck, because Brett from Photzy has an exclusive offer for dPS readers over the next week.

This is an affiliate partnership with Photzy. dPS receives a commission when you purchase via our special offer links.

The Photzy Action Cards are 65 beautifully designed & printable project sheets that will give you over 200 photography assignments, covering everything you can imagine!

Save 88% on 200 Photography Assignments that Inspire, Motivate and Teach

Brett’s idea for the Action Cards was sparked by a woman’s comment to him at a camera club meeting.

“I wish that I could have a workshop in a box. So that I could just open the box and participate when I felt like I had the time and the energy.”

So Photzy set out to create something that will educate and motivate you, provide you with direction, and help you to learn through actionable photography assignments.

The full set of Action Cards include:

34 composition Action Cards aimed toward assisting you in fully understanding the various rules, tools, and concepts of composition. Some example assignments:

  • S and Z Curves
  • Dynamic Angles
  • Juxtaposition
  • Spirals
  • Visual Weight and Direction

Just as we all ‘see’ differently – we also all work differently. This is your chance to discover which composition tools fit your style.

31 genre Action Cards which allow you to test the waters for 31 different genres of photographic imaging – by completing specific tasks and photo assignments in each genre – and help you uncover your ‘place’ in the photographic world. Some example assignments:

  • Creating jaw-dropping landscape photography
  • Creating beautifully executed high key photography
  • Creating true minimalist photography
  • How to create portraits of newborns
  • Creating meaningful travel photographs

Perhaps you’ll discover your natural tendencies reveal themselves better through outstanding flower photography versus newborn portrait photography.

We believe this new training tool will be exactly what many of you need to motivate and guide you on an experience of personal photographic discovery all on your own. Armed with these cards you’re guaranteed to be on a fast path to ‘expanding’ your shooting skills and mastering photography in 2020 and beyond.

Learn more and buy your Action Cards here

FAQs

We always get a great deal of interest in Photzy’s Action Cards and naturally lots of questions. Photzy have helped us answer them for you.

Q: Are the Action Cards different to the SNAP Cards?

Yes! They are completely different.

The SNAP! Card line was developed to present small easily digestible photographic lessons that you could consume virtually anywhere. Like Cheat Sheets…

The ACTION! Card line is geared towards the individual that prefers to learn by engaging in self-assigned photographic activities. A learning element is included, but the primary purpose of the product is to motivate you to learn through an actionable assignment and review process.

Q: Is this a downloadable file, or will I receive the printed cards in the mail?

You will be receiving a downloadable PDF file of the cards, for you to print out at home or download to your mobile device. This means you can access them anytime anywhere, and you don’t have to worry about losing them.

In just MINUTES from right now… You could be well on your way to taking your photography to the next level. No need to wait for shipping!

Go here now to grab your copy of the cards

Q: Why should I print these out?

Be honest – How many times have you downloaded a guide and never actually read it?

We’ve found that printing materials ensures you actually go on to read the content. Simply put– if you print it out, you are far more likely to take ACTION, and get RESULTS. That’s important to us.

Q: Are these Action Cards for beginners?

These cards are designed to cater for photographers of all levels. If you’re a beginner, these cards are going to work wonders for you with a whole range of material to sink your teeth into. If you’re a professional looking to extend your range of skills – we’ve got you covered too.

Get your copy here now

Q: Will this work for my camera?

While some of the settings information on the genre cards will of course not be useful depending on your chosen camera. 95% of the information on the Action Cards are not camera specific. So whether you are shooting on a DSLR, Mirrorless, or even an iPhone, you will find these incredibly to improve your photography skills.

Q: Is there a guarantee?

Absolutely!

In fact, when you claim your copy of The Action Cards, you have a full 365 days to decide whether or not you want to keep it. Meaning – you get an entire year to try them out…

And if for ANY reason, you decide the cards don’t work for you, simply contact Photzy for a full, prompt refund… No questions asked and no hassles.

Q. How do I buy the Action Cards?

For one week only Photzy is offering dPS readers access to this practical training tool for just $37USD. At $5 per card the full set is valued at $325USD, so that’s 88% off.

Here’s where you can take advantage of this risk-free trial of the cards:

Click Here to Try The Action Cards TODAY

The post Save 88% on 200 Photography Assignments that Inspire, Motivate and Teach appeared first on Digital Photography School. It was authored by Darren Rowse.


from Digital Photography School https://ift.tt/2u4g1tY

Tips for Using Photographic Minimalism to Great Effect

The post Tips for Using Photographic Minimalism to Great Effect appeared first on Digital Photography School. It was authored by Simon Bond.

In today’s article, you’ll learn a key tip for improving your photography. After all, when you understand that photography is the art of subtraction, it makes sense that minimalism works so well for photography.

This means that employing photographic minimalism in your work will immediately improve your results. Let’s take a look at what minimalism is, where you’ll find it, and how to use it in your own photos.

photographic minimalism fisherman example
Shooting upward toward the fisherman helped produce a minimalist photo.

What is minimalism?

Minimalism, as the name suggests, is about keeping things simple. It means avoiding clutter, which in photography equates to removing unwanted elements from your photos.

You do want a main subject, though; this is needed for the minimalist parts of your photos to have something to contrast with.

Key elements of photographic minimalism

The great thing about minimalism is that it can be applied to almost every genre of photography, including portrait, landscape, and still life. The only area where minimalism doesn’t always work well is street photography, where you often want to show more of the scene.

Therefore, the key aspects of photographic minimalism are the following:

  • Negative space: This refers to an area of empty space in your photo. The negative space still needs to work compositionally, but that space is what will give your photo its minimalism.
  • Small main subject: The main subject should not fill the frame. It needs to be present, but have enough space around it for the photo to breathe.
  • Avoid clutter: When you compose a photo, do so in such a way that you include the main subject and the background with little else.
photographic minimalism ice cream cone
This photo uses a wall similar in color to the ice cream.

The best location for photographic minimalism

It’s possible to produce photographic minimalism in almost any location.

The important factors are the angle you photograph at and the focal length of your lens. Here are a few possible ideas you can use:

  • Minimal locations: Places like coastlines and deserts offer minimalism pretty much wherever you point the camera.
  • Urban settings: Look for a plain wall and use this as a background for a minimalist portrait.
  • A shard of light: Go for low-key minimalism by locating a shard of sunlight, or by putting a snoot on a flash and aiming it at a person. Then expose for the light on that person, while leaving the background underexposed and dark.
  • Product photos: Use a lightbox to produce high-key product photos that are surrounded by white (or by the background color that you choose).
photographic minimalism boat on ocean
The ocean is minimal by nature. The ripples on the water add interest to the negative space.

Which lens works best?

The lens that works best for minimalism will depend a lot on the location you’re photographing. It may be hard to produce minimalism with a wide-angle lens in an urban setting, but take the same lens to a desert and it’ll do a great job. The following is a guide to help you choose the correct lens:

  • Wide-angle: Use a wide-angle lens in a location where you can fill the frame with one particular background. That background will often be the sky, but could equally be rolling green hills. This works best in rural areas.
  • Telephoto: It’s easier to produce minimalism when you use a telephoto lens. This is because you can zoom in on a specific area to avoid elements that clutter the frame. When using a long focal length, ensure there is enough negative space around your main subject.
street photo photographic minimalism
It’s possible to take minimal street photos, as well. Simply find a wall with a strong color to photograph against.

Change the angle

A simple change of angle can have a big impact on your photos and help you produce photographic minimalism. Stepping to the side or crouching down to the ground can be all it takes to remove a distracting element from your composition.

Here are some options that will turn a cluttered scene into a minimalist one:

  • A bird’s-eye view: This works best where you have fields or a coastline, so the location is already minimalist.
  • Crouching below a wall: Use a wall as the horizon line and aim up towards the sky. The wall blocks out the usually busy horizon, and you can add a person as a silhouette against the sky.
  • Compression: I already talked about this in the section about lenses and focal length, but zooming in to remove distracting elements from the edge of the frame works well.
  • Move to the side: A single step can be all it takes to change the background from cluttered to minimal.
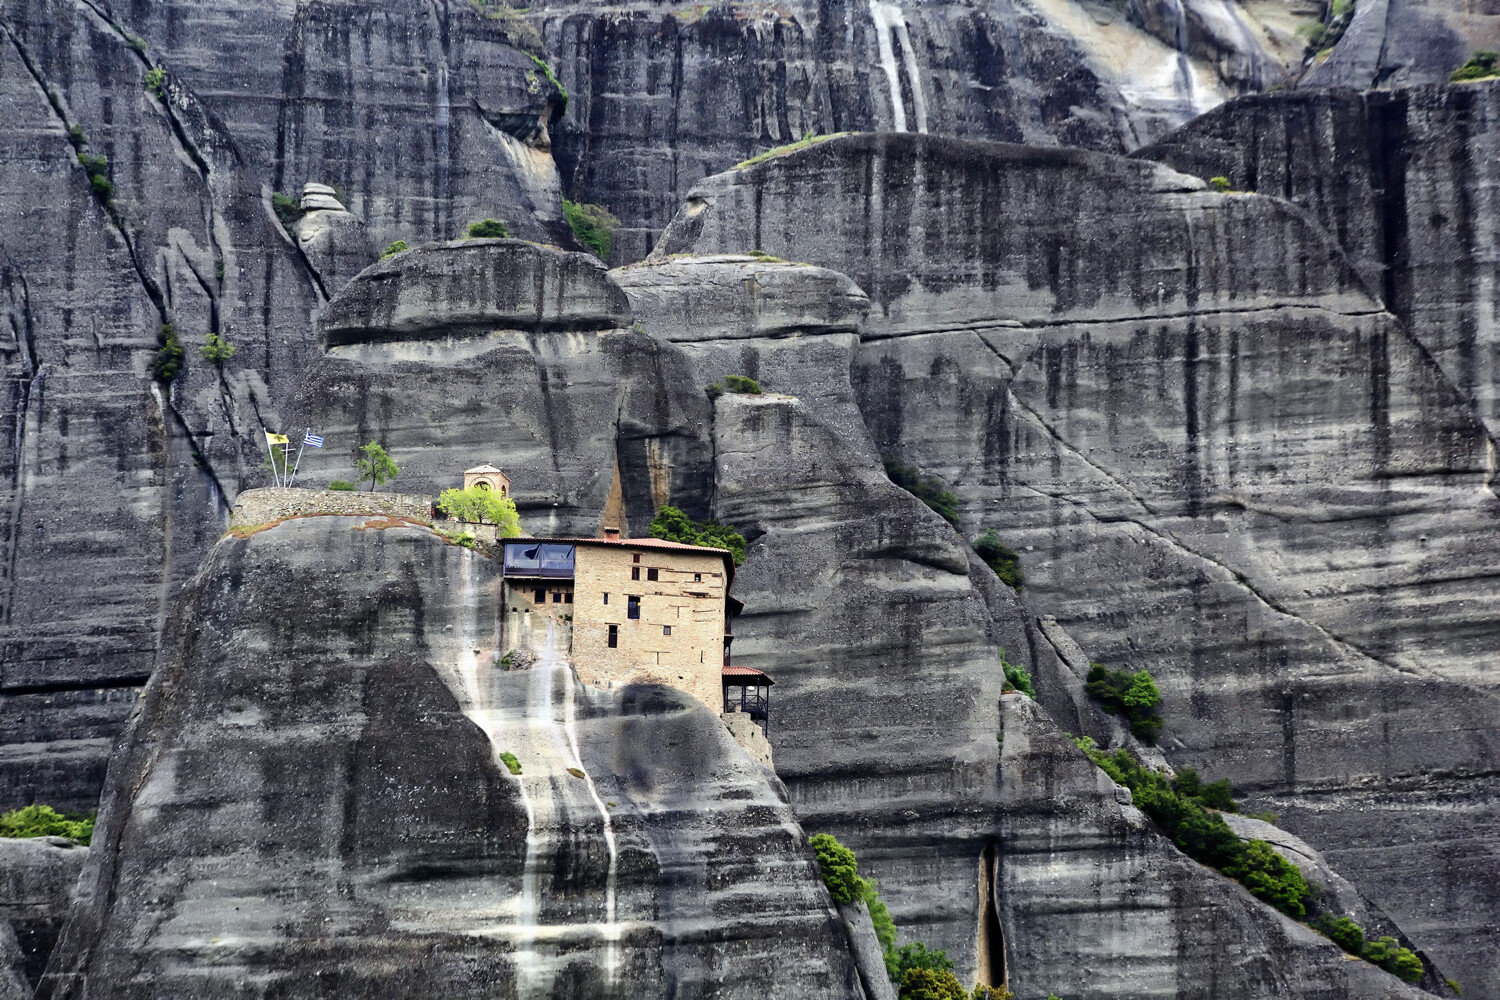
photographic minimalism Greek monastery
This photo shows a monastery at Meteora in Greece. A long focal length is used and the rocks create a minimal, textured background.

Post processing can help

Now, it’s best to get your photo right from the start and simply change your position so that you can compose a minimalist photo.

That said, there are times that creating a minimalist composition in-camera isn’t possible, yet the photo is still very much there to be taken. There could be a lamppost or an electric pylon that comes into your frame.

Fortunately, it’s increasingly easy to clone out unwanted elements from your photo. And once you’ve done that, you’ll have created minimalism.

photographic minimalism farmworker in Laos
This farmworker in Laos works as a great main subject to add interest to the composition.

Maximize your photos with minimalism!

A lot of successful photos use minimalism to great effect. Are you a minimalist with your photography? If so, how do you go about taking photos in the minimalistic style? If you have ideas and photos you’d like to share, please do so in the comments section below.

Now it’s time to maximize your creativity with photographic minimalism!

The post Tips for Using Photographic Minimalism to Great Effect appeared first on Digital Photography School. It was authored by Simon Bond.


from Digital Photography School https://ift.tt/34ffJlV