Friday, 23 June 2023

Generative Fill in Photoshop: The Essential Guide

The post Generative Fill in Photoshop: The Essential Guide appeared first on Digital Photography School. It was authored by Ana Mireles.

A guide to Generative Fill in Photoshop

Have you heard about the new Generative Fill tool in Photoshop? It’s given professional and amateur photographers quite a lot to talk about, and for good reason; thanks to Generative Fill, you can create realistic digital art using simple text prompts.

So don’t stay out of the conversation! Give Generative Fill a go so you can understand the potential and limitations of this new tool.

And if you’re worried about getting started, don’t be. In this article, I’ll tell you everything you need to know to get the tool up and running, plus I’ll give you some examples and tips so you can make the most out of the Generative Fill feature.

Let’s dive right in!

What is Photoshop’s Generative Fill feature?

Photoshop Generative Fill

Generative Fill is a new text-to-image tool that’s available in Photoshop Beta. Type a word or a sentence, and the tool will generate a digital representation of what you wrote.

Not only does Generative Fill produce content on command, but it also matches the lighting and perspective of the existing photo for a much more realistic result.

Generative Fill can also create content without a text prompt. If you don’t prompt the tool and instead leave it blank, it will use information from the surrounding area to generate new pixels, which can be very useful if you want to remove (and replace) a portion of your photo or extend an existing image.

When is Generative Fill useful?

Photoshop Generative Fill

Generative Fill offers four main features: Removing objects, adding objects, creating backgrounds, and expanding images. So when do these options come in handy?

For one, the tool is perfect if you want to create a digital background – anything from artistic bokeh to a landscape with mountains.

It’s also useful if you want to extend an existing photo to fit a specific format or if you need more space to improve the composition.

Generative Fill can also be helpful if you accidentally cut off an important element when photographing; you can use it to recreate the missing part of your subject (and expand the surrounding area).

It’s also a great way to add props or incorporate elements that are missing from the picture. Say you’re taking a photo of a cheesecake with strawberry jelly. Maybe strawberries aren’t in season, but a few strawberries would be the perfect prop to style your photo – so you just add them in with Generative Fill!

Finally, you can generate an entire work of art using just Generative Fill. The tool doesn’t need an existing image to work; you can start with a blank canvas, fire up Generative Fill, and use it until your photo is complete.

How to use Generative Fill: step by step

Now that you’re familiar with the basics, let’s take a look at how you can start using Generative Fill!

Step 1: Download Photoshop Beta
Photoshop Generative Fill

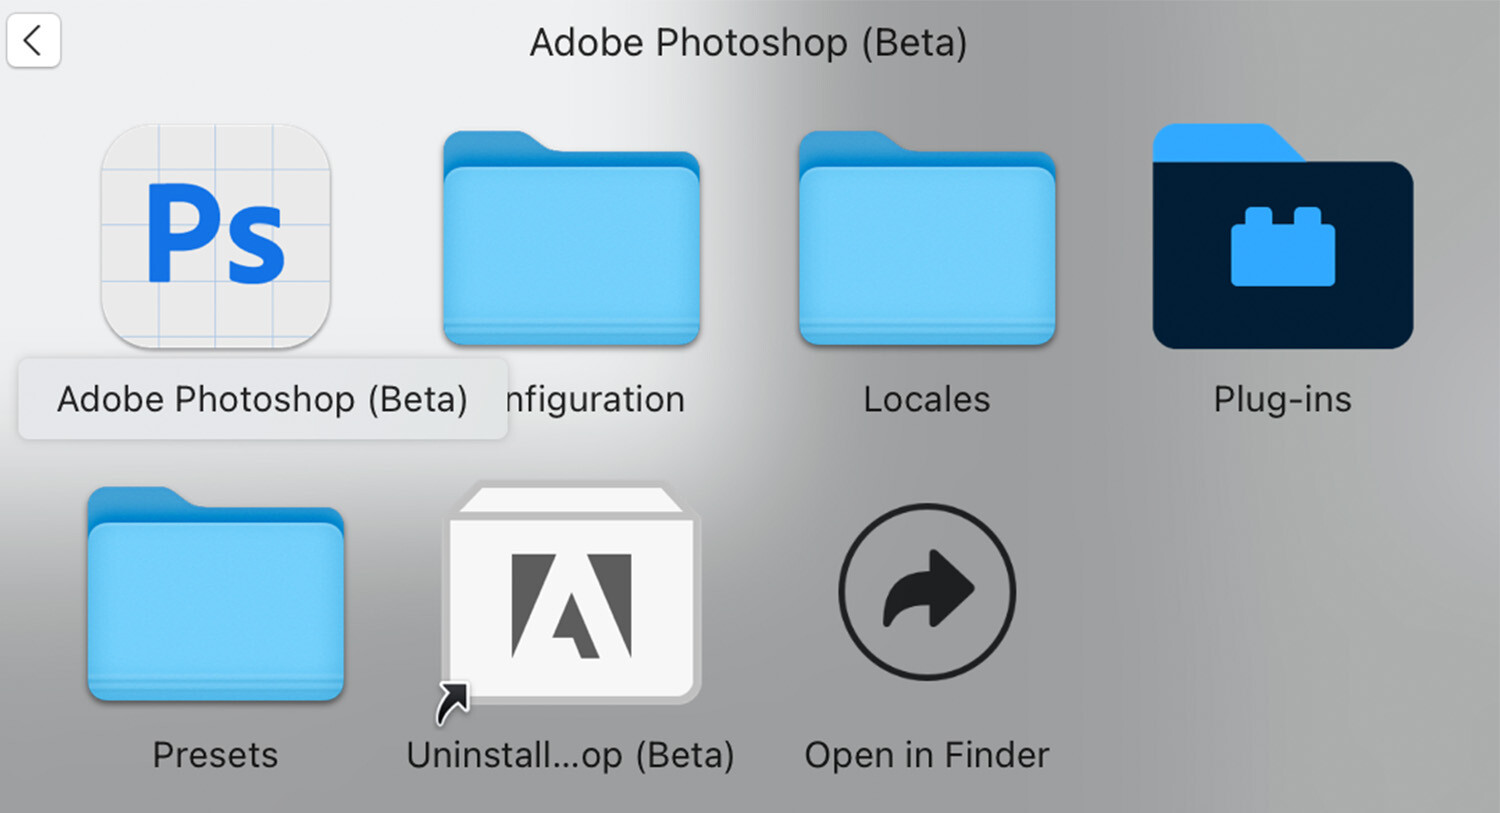
At the time of writing, Adobe hasn’t added the Generative Fill tool to its standard Photoshop program. Instead, to work with it, you need the Beta version of Photoshop (which is a different app that can be downloaded from the Creative Cloud app).

So open the Creative Cloud application on your computer. Then find the Beta apps and install Adobe Photoshop (Beta).

Step 2: Open an image

Photoshop Generative Fill

Now that you have Photoshop Beta on your computer, go ahead and launch it. Simply click on the Photoshop Beta shortcut (its icon is a blue Ps on a white squared paper).

If you’ve spent time working in Photoshop, Photoshop Beta won’t feel much different. If you want to start a project from scratch, choose New File on the left-hand side. Then input the size and resolution, or choose one of the existing templates and click Create.

If you want to enhance an existing photo, choose Open, then browse until you find the file you’re after. You can also select Lightroom photos if you want to fetch one of your images saved in your Lightroom catalog.

Step 3: Make a selection and open Generative Fill

At this point, you should have an image (or a blank canvas) open in Photoshop.

So make a selection on the area where you want to apply the Generative Fill feature. If you’re creating a background, for instance, you would select the entire canvas. If you’re adding some birds to a landscape, you’d simply select the small area of sky where you’d like the birds to appear.

Note that you can create your selection using any of the selection tools offered in the standard version of Photoshop.

Once you’ve made a selection, the floating taskbar will change, and you’ll see the Generative Fill option on the left-hand side.

Photoshop Generative Fill

(If you can’t see the bar, you can enable it by going to Window>Contextual Bar. You can alternatively access the Generative Fill tool from the Edit menu.)

Step 4: Add your text prompt

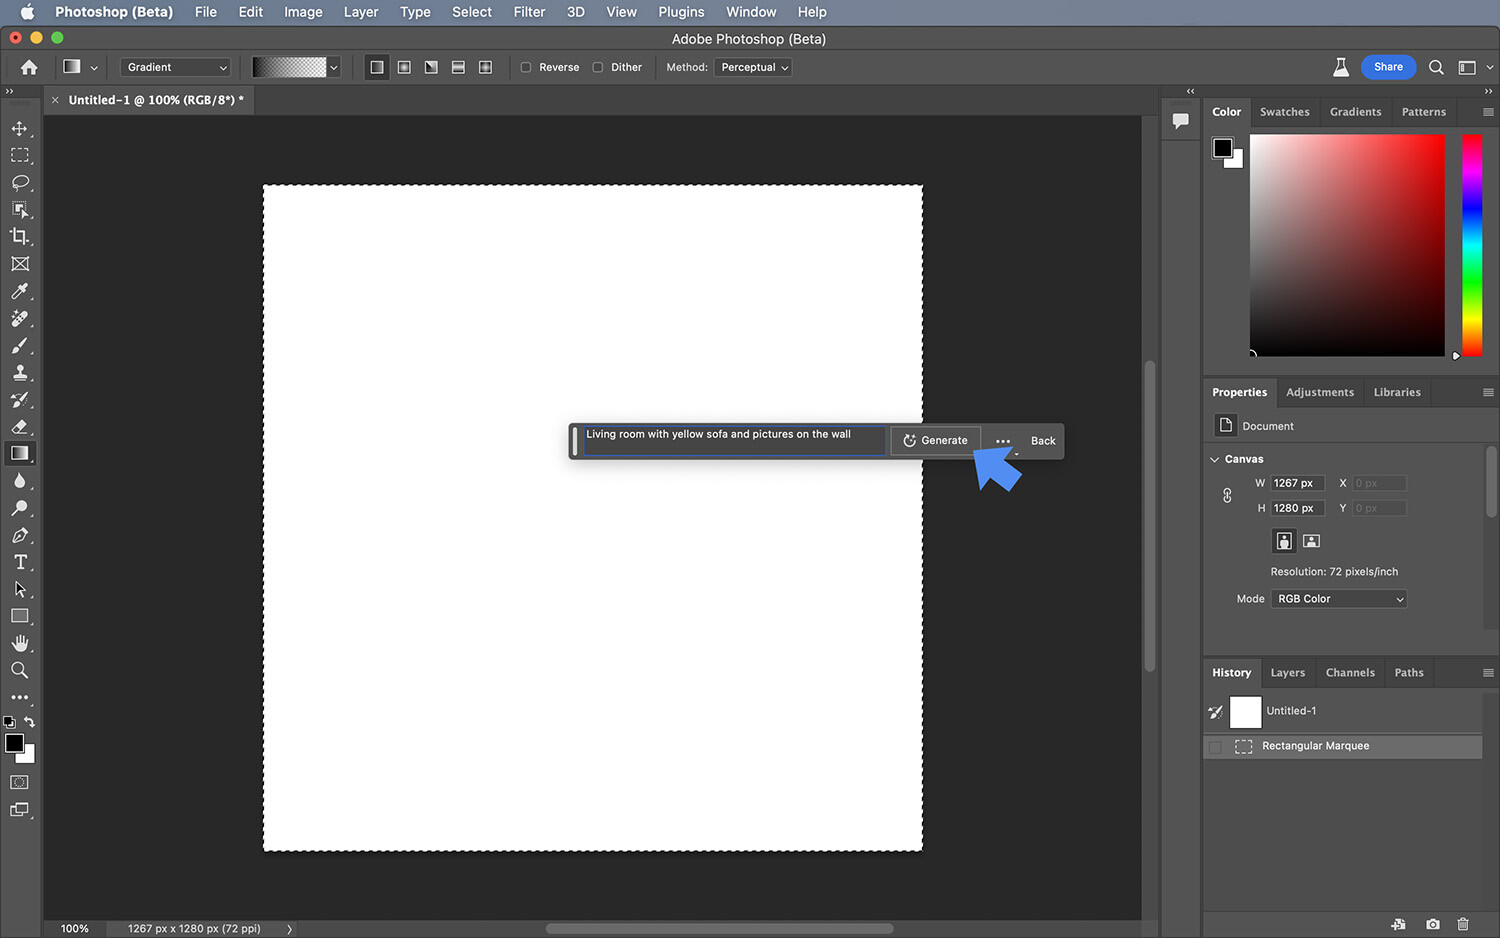
Click on the Generative Fill option and type whatever you want to create. At the moment, it only works in English.

You can also click on Generative Fill but leave it blank; this will prompt Photoshop to create whatever it wants. Then click Generate or press the Enter key on your keyboard.
Photoshop Generative Fill

Step 5: Choose from the results

Photoshop uses each prompt to generate three variations. To see these options, go to the Properties panel and click on each thumbnail. Choose the one that you like best, and you’re done!

Photoshop Generative Fill

Generative Fill in action: a hands-on example

In this section, I take you through the process of enhancing an image with Generative Fill. I’ve specifically chosen a somewhat boring flower photo, and I give you the exact steps I used to make it far more interesting (while also extending the background).

You can see the original image on the left as well as my enhanced image on the right:

Photoshop Generative Fill

Step 1: Add a subject

Photoshop Generative Fill

When I took this flower photo, I was actually trying to photograph a bee, but it flew away before I could fire the shutter. So my first move will be to add a bee back in.

I’m going to select a piece of the petal, then simply type “bee” in the Generative Fill field, click Generate, and the bee will appear!

Step 2: Fill the background to improve the composition

Now that I have the subject I wanted, I need to fix the composition. The background takes up a lot of the frame, but it’s rather boring.

To fix this, I’ll add some bushes and flowers. I’ll use the Lasso tool to select the area underneath the flower since I don’t have to be very precise, then type “bushes and flowers” into the text field. Once I click Generate, here’s what I’ll get:

Photoshop Generative Fill

Notice how the flowers and bushes match the depth of field in my original image – pretty cool, right? (Also, remember that you get three variations for each Generated element; I’m choosing the third variation because it looks better than the others.)

Step 3: Extend the background

Photoshop Generative Fill

I’ve decided I want the picture in a landscape format, so I’m going to extend the canvas size. (This is simple to do using the Crop tool – you can just drag the edges. Alternatively, you can select Image>Canvas Size.)

Next, I’m going to select the empty areas. In this case, it’s easier to do it with the Rectangular Marquee tool. Make sure you include part of the image in the selection to give the Generative Fill tool enough information to continue the background coherently.

Click on Generative Fill to activate the tool, but leave the text field blank. Click Generate and choose the best variation.

Step 4: Fine-tune the background

I’ve extended the background realistically, but I really feel like it needs some more interesting elements. I’m going to add a lens flare on the left side by selecting the relevant area and typing “lens flare” into the prompt.

And for a finishing touch, I’m going to add some more plants on the right side where the empty branches are now:

Photoshop Generative Fill

For comparison’s sake, here’s the original and the enhanced image once again:

Photoshop Generative Fill

A few quick tips for using Generative Fill

The Generative Fill feature is still in Photoshop Beta, so it’s not perfect – yet. Here are a few tips to get better results:

1. Include pixels in the selection

Photoshop Generative Fill

In most cases, it’s important to create selections as precise as possible. You don’t want to include anything from the surrounding areas when you’re compositing or masking.

But when you’re using Generative Fill, forget about all that! This AI tool benefits from having some data to work with – so including pixels in the selections from the surrounding areas will yield better results. This is especially true if you’re extending the background or merging images.

2. Be as precise as you can with your text prompts

Photoshop Generative Fill

Whenever you’re typing a text prompt in the Generative Fill field, be as specific as possible. For instance, instead of typing “beach sunset,” type “sun setting in the background of a sandy beach with ocean waves crashing on the wharf.” And instead of just typing “flower,” type “blooming red rose” and so on. This will save you a lot of time by generating images that fit your creative vision more precisely.

This only works, of course, if you have something clear in mind. Otherwise, you may appreciate the tool’s randomness, and you can be deliberately vague just to see what you get.

3. Build upon the original variation

Photoshop Generative Fill

If you type in a prompt and you don’t get a perfect result, don’t be discouraged. In fact, Generative Fill is very rarely flawless (at least at this stage of the tool’s development).

So instead of starting over with a new text prompt or simply quitting the project, build on the best variation you have.

Let’s say you want to generate a portrait of a woman. Maybe the hair doesn’t look the way you imagined – you wanted short curls, but you got long, straight locks instead. Simply select the hair, then type in a new prompt instead of trying to generate an entirely new portrait from scratch.

The same goes for the obvious errors. Generative Fill still has problems with fingers and teeth, plus it can also create patterns or include random pixels that don’t fit. In such cases, you can select the area and try a new text prompt, or you can try it without a prompt. (If you do the latter, it’ll work as a content-aware fill tool and correct the issue.)

Generative Fill in Photoshop: final words

Generative Fill is a powerful method of enhancing your photos, and it’s likely only the beginning. However, before I sign off, I’d like to mention one more thing: legalities.

It’s quite complicated to talk about the legal implications of AI usage in photography at this point. However, there’s one thing that’s very clear when using this new Photoshop feature: It can’t be applied to your commercial work. This and other important considerations are stated in the Adobe Generative AI Beta User Guidelines, so I encourage you to check them out!

Now over to you:

Now that you know how to work the Generative Fill tool, let us know what you use it for! Share with us your images, and let us know if you have any other tips for better results!

The post Generative Fill in Photoshop: The Essential Guide appeared first on Digital Photography School. It was authored by Ana Mireles.


from Digital Photography School https://ift.tt/3kZUyQV

Znos Online Photo Gallery: An Essential Platform for Pro Photographers

The post Zno’s Online Photo Gallery: An Essential Platform for Pro Photographers appeared first on Digital Photography School. It was authored by Jaymes Dempsey.

Zno's online photo gallery platform

It’s the perennial problem for portrait and event photographers: Once images are captured, how can they be presented to clients in a way that’s both simple and elegant, effective yet inexpensive? Even more importantly, how can the files be displayed to encourage print sales?

On the one hand, you don’t want to spend hundreds of dollars on a complex platform that only confuses the client. On the other hand, basic solutions like Dropbox and Google Drive, while convenient, are too rough around the edges for professional use. 

That’s where client galleries come in. They offer a straightforward platform for sharing photos, but the designs are polished and specifically cater to photography clients. Plus, if you choose the right software, galleries can include print sales and even automatic print fulfillment.

Of course, not all gallery platforms are equally effective, and that’s where this article can help you out. Below, we explore the ins and outs of online photo galleries, with a focus on a favorite platform of ours: Zno. Not only does Zno produce software for photographers, but the company also runs a top-notch print lab. The result? An outstanding client gallery experience that rolls image display, print sales, automatic order fulfillment, and plenty of extra benefits into one low-priced package. 

So if you’re ready to discover how Zno’s powerful platform can help you boost customer satisfaction and profits, then let’s dive right in!

Zno online photo gallery

A client gallery is a method of displaying images for clients to view following the completion of a photoshoot (e.g., a newborn session, a high-school senior session, or a wedding). 

They tend to offer elegant designs that far outclass simple photo-sharing solutions like Dropbox, and they’re designed so clients can appreciate dozens – or even hundreds – of images with minimal hassle.

The goal is to share photos with clients, but these online galleries can be used in a variety of ways: for proofing, to show off finished photos, to allow clients to choose images for printing, and more. Therefore, you can expect most galleries to include certain basic features, such as the option for clients to download files in a variety of sizes, as well as a selection mechanism so clients can pick their favorite shots for further editing or printing.

What is an online store for photographers?

Zno online photo gallery

An online store for photographers is a platform that allows photographers to upload images from photoshoots, which are then offered as print and/or digital products for purchase.

A wedding photographer, for instance, might create an online store that allows the married couple to order fine-art prints, acrylic prints, and even photo albums featuring their wedding-day photos.

Note that online stores can offer several order fulfillment methods. Digital images are generally available to download directly from the store, whereas physical prints and other print-type products will need to be processed by labs. These labs may partner directly with the online store, in which case orders are often fulfilled directly by the lab with no work on the part of the photographer; this process is known as automatic fulfillment

Sometimes, however, the photographer might choose to offer products that don’t come from fully integrated partners. As part of the self-fulfillment process, the photographer would then need to review each new order, (manually) place it with the relevant lab, then ensure the product is successfully shipped to the customer. 

Zno online photo gallery

Some client gallery platforms directly incorporate online stores for a seamless viewing and purchasing experience. The basic process works like this:

First, the photographer uploads their finished photos to a client gallery, then sends an email to the client inviting them to access the gallery via a simple link. 

Once the client clicks the link, they can view the gallery and select their favorite photos (for instance, by starring or favoriting different files). 

Thanks to the integration between the gallery and the store, the client can see print options and prices when viewing the photos – and can then choose to purchase prints of their favorite shots by placing an online order.

Finally, the photographer collects the payment sent by the client and ensures the order is fulfilled (either automatically or manually). Depending on the integration between the online store and the print lab, the photographer may only receive the profits, or they may receive the entire fee (but then need to use a portion to cover the costs of third-party print products).

If you’re sold on the promise of a client gallery but you’re not sure which platform to pick, I encourage you to consider Zno Gallery. It’s one of the best online photo galleries for photographers, and here are just a few of the reasons why:

25% off select Zno print products

Zno online photo gallery

When you subscribe to any of the Zno Gallery paid plans – including the Basic plan at just $5 per month – you get an impressive 25% off an array of Zno products. The discount applies to select standard prints but also extends to wall art, tabletop plaques and blocks, and even print set collections. 

Note that the discount works on both personal and customer orders. In other words, you can gain massive savings on your own print orders, and you can also dramatically decrease costs for the prints you sell to customers. 

0% commission fee even on the Free Plan

Zno online photo gallery

If you’re not quite ready to commit to a paid photo gallery plan, don’t worry; Zno boasts a Free Plan that includes both gallery and store functionality.

In fact, most of the top platforms offer some type of free option. They’ll let you upload photos for both sharing and sales, and you can receive orders and start making real money from your work. 

But here’s the critical distinction between Zno and competitor companies like Pixieset, Pic-Time, and CloudSpot: With Zno, you will never pay commissions on your sales, whether you use the free Gallery plan or the most advanced Unlimited plan. Your profits are your own. 

The competition, however, is rarely so generous. Create an e-store gallery using a free plan, and expect Pixieset, Pictime, and CloudSpot to take 15% commissions on every sale you make. If you’re a young photographer just breaking into the business, you need all the profits you can get, and 15% can make a huge difference to your bottom line.

You can apply any store credit or promos to orders

Zno online photo gallery

Remember how I said that Zno was both a lab and a software company? As it turns out, this dual focus comes with a huge benefit: Lab store credit and promotional discounts on Zno products can be applied, not just to your personal orders, but to customer orders.

Imagine, for example, that Zno is offering a 50% discount on acrylic blocks for Black Friday. If a client then orders an acrylic block from your online photo gallery, Zno will apply a 50% discount to the order. The client will pay the price that you listed in the client gallery, but Zno will take 50% less in fulfillment (i.e., material) costs. And as a result, your profits will increase significantly!

The same is true of credit gained through the Zno Pro plan. As a Pro subscriber, you get up to 25% back – in the form of credit rebates – on your Zno store purchases. The credit can then be applied to orders from your customers; that way, Zno takes less for material costs and you get a profit boost.

Note that both sales and store credit can even be combined with the 25%-off discount you get (on select products) as part of the Zno Gallery paid plans. 

Zno online photo gallery

Zno doesn’t just offer a powerful gallery platform. The company also boasts a bevy of photo-focused programs, such as Zno Designer (for designing custom albums and other print products), Zno Slideshow (for producing high-quality slideshows), and Zno Retoucher (for quickly and effectively processing your photos). 

These programs are certainly useful for professional photographers, but they also come with another significant benefit: Because Zno developed each application in the context of an all-in-one platform, the app suite is extremely well integrated. You can purchase a single subscription to gain access to the entire set of Zno apps, and you also only need to create a single account with one login. 

There’s also a dashboard that allows you to launch all of your apps; it’s like a handy toolbox for tackling client galleries, slideshows, album designs, and more. But most importantly, the various Zno programs feature integrated functionality, meaning that the work you do in one app can prove useful when tackling tasks in another app. For instance, photos uploaded to Zno Gallery can then be used to create albums in Zno Designer or client slideshows in Zno Slideshow.

If you do want to take advantage of Zno’s entire set of programs, there is a package subscription that comes with a major discount.

I’ve touched on this throughout the article, but it’s so unique that it bears repeating: Zno offers software and in-house printing. Therefore, the integration between the company’s online photo gallery platform and its lab is genuinely seamless; as soon as a client places an order in their gallery, Zno is able to instantly proceed with order fulfillment at no cost to you.

This smooth integration also comes with a couple of other major advantages. For one, certain Zno plans offer discounts on select print products, and you can also increase profits with the help of store rebates and Zno lab sales. 

You can also sell albums directly from client galleries, an option not available in online stores created by competitors like Zenfolio and ShootProof.

To access the Zno Gallery platform, you’ll need to sign up for a monthly or yearly subscription plan. Fortunately, the options are very reasonably priced, and each of the Zno paid plans offer complete gallery and e-store functionality as well as 0% in commissions.

In addition to its Free Plan, Zno offers:

  • A Basic Plan with 10 GB of storage ($5/month with annual billing or $7/month with monthly billing)
  • A Standard Plan with 100 GB of storage ($10/month with annual billing or $14/month with monthly billing)
  • An Unlimited Plan with unlimited storage ($20/month with annual billing or $28/month with monthly billing)
Zno online photo gallery

Below, I run through the pricing offered by competitors. As you’ll see, Zno’s plans are consistently cheaper than the alternatives, whether you look at entry-level options for photographers just entering the business or unlimited-storage options for established professionals.

Pixieset Pricing

Zno online photo gallery

Pixieset does offer a Free Plan, though it comes with a 15% commission fee. Here’s a breakdown of the company’s paid plans:

  • A Basic Plan with 10 GB of storage ($8/month with annual billing or $10/month with monthly billing)
  • A Plus Plan with 100 GB of storage ($16/month with annual billing or $20/month with monthly billing)
  • A Pro Plan with 1000 GB of storage ($24/month with annual billing or $30/month with monthly billing)
  • An Ultimate Plan with unlimited storage ($40/month with annual billing or $50/month with monthly billing)

ShootProof Pricing

Zno online photo gallery

ShootProof offers a 100 Photo Free Plan, as well as:

  • A 1500 Photo Plan with 75 GB of storage ($8.33/month with annual billing or $10/month with monthly billing)
  • A 5000 Photo Plan with 250 GB of storage ($16.67/month with annual billing or $20/month with monthly billing)
  • A 25000 Photo Plan with 1250 GB of storage ($25/month with annual billing or $30/month with monthly billing)
  • An Unlimited Photo Plan with unlimited storage ($50/month with annual billing or $60/month with monthly billing)

Zenfolio Pricing

Zno online photo gallery

Zenfolio doesn’t offer a free plan. Here are the company’s subscription offers:

  • A Portfolio Plan with 15 GB of storage ($7/month with annual billing or $9/month with monthly billing)
  • A PortfolioPlus Plan with 150 GB of storage ($19/month with annual billing or $23/month with monthly billing)
  • A ProSuite Plan with unlimited storage ($33/month with annual billing or $40/month with monthly billing) 

Pic-Time Pricing

Zno online photo gallery

Pic-Time offers a Free Plan (with 15% in commission fees). Alternatively, you can purchase:

  • A Beginner Plan with 20 GB of storage ($7/month with annual billing or $8/month with monthly billing)
  • A Professional Plan with 100 GB of storage ($21/month with annual billing or $25/month with monthly billing)
  • An Advanced Plan with unlimited storage ($42/month with annual billing or $50/month with monthly billing) 
  • A Multi-Brand Plan with unlimited storage ($58/month with annual billing or $67/month with monthly billing)

CloudSpot Pricing

Zno online photo gallery

CloudSpot’s Free Plan comes with a 15% commission fee. Paid plans include: 

  • A Lite Plan with 100 GB of storage ($12/month with annual billing or $15/month with monthly billing)
  • A Pro Plan with 350 GB of storage ($24/month with annual billing or $30/month with monthly billing)
  • An Unlimited Plan with unlimited storage ($34/month with annual billing or $45/month with monthly billing) 

Online photo galleries and Zno review: final words

Online photo galleries are effective, straightforward, and elegant platforms that I recommend every professional event and portrait photographer try – whether you’re looking to share photos with clients or sell high-quality print products. 

And out of all the platforms you might pick, Zno stands out. The company offers outstanding integration between its print lab and client galleries, and its prices blow the competition out of the water. That’s not to mention the profit-boosting print discounts, the all-in-one app suite, and the no-commission Free plan!

So head on over to the Zno website and explore the Gallery platform. See some of the discounts for yourself, consider the benefits of each plan, and imagine creating – and sharing – galleries of your own. Will your clients be impressed? I’d bet on it!

Zno is a paid partner of dPS.

The post Zno’s Online Photo Gallery: An Essential Platform for Pro Photographers appeared first on Digital Photography School. It was authored by Jaymes Dempsey.


from Digital Photography School https://ift.tt/DjEoux7

Thursday, 22 June 2023

What Is the Best Focal Length? A Comprehensive Guide

The post What Is the Best Focal Length? A Comprehensive Guide appeared first on Digital Photography School. It was authored by Jason Checkla.

A guide to the best focal length in photography

What is the best focal length in photography? What are the uses of different focal lengths? And – most important of all – what focal length should you use in your photos?

In this article, I aim to address all of these questions and more. I share plenty of common focal lengths, making sure to explain why they’re great and when they should be used (or avoided). I also discuss the best focal lengths for several different genres, such as portrait and landscape shooting – and I include plenty of examples so you can see the different focal lengths in action.

Note that whether you shoot with zooms or primes is unimportant. All the focal lengths in this article are achievable through either lens type, so no need to fret if you prefer zooms over primes or vice versa. Instead, just focus on the focal lengths I discuss, and you’ll be just fine!

What is focal length in photography?

The best focal length in photography

Put simply, focal length is the level of zoom that a lens offers. It determines how much of the scene you can capture and how close or far away objects appear.

Consumer lenses come in a range of focal lengths (from around 8mm to 800mm). On the low end, we have ultra-wide lenses that can capture a vast portion of the scene. On the high end, we have ultra-long lenses like 800mm, which capture only a tiny sliver of the scene and are perfect for getting close to distant subjects like wildlife.

Note that focal length is a property of the lens, not the camera. Some lenses offer wide focal lengths, some offer standard (medium) focal lengths, and some offer telephoto focal lengths. Prime lenses are capable of photographing at a fixed focal length, such as 50mm, while zoom lenses can shoot at multiple focal lengths, like 24-70mm, allowing you to adjust your crop as needed.

Different focal lengths cater to different genres and photographic subjects, so the best focal length for you will depend heavily on what you want to photograph. Are you into capturing breathtaking landscapes, compelling portraits, bustling street scenes, or intricate macro details? Each genre has its own set of ideal focal lengths (as I explore throughout this article!).

Common focal lengths to consider

The best focal length in photography

Below, I share a few of the most common focal lengths you’ll encounter in photography. I’ve made sure to note the pros and cons of each, and I’ve also noted when each focal length is generally used. Of course, photography is a creative activity, so don’t feel hemmed in by any of my recommendations; there’s always room to break the rules and innovate!

1. 24mm

The best genres for 24mm lenses: landscape photography, astrophotography, group portraits, real-estate photography, architectural photography, and event photography

24mm is a beautiful focal length, one that offers a wide-angle field of view without taking you into ultra-wide territory. It’s easy to experiment with, not only because there are many affordable 24mm prime options available, but also because you’ll find this focal length at the wide end of many zoom lenses, such as a 24-70mm f/4 or f/2.8. Also, many kit lenses feature a 24mm wide end once you account for the APS-C crop factor.

A 24mm prime lens will be sufficiently wide and remarkably sharp, making it an ideal candidate for landscape photography. Zooms are wonderful for landscape photography, too, but the locked-in field of view (on a 24mm prime lens) will force you to think carefully about your compositions.

landscape at 24mm

The 24mm focal length also excels in low-light situations. That includes astrophotography, where 24mm lenses with wide maximum apertures (i.e., f/2.8) will facilitate shots of the Milky Way, as well as event photography, where you’ll have an ample field of view for environmental, contextual shots, plus the wider maximum aperture will facilitate sharp shots indoors and at night.

Additionally, the 24mm focal length is wide enough to capture group portraits with minimal perspective distortion. Just don’t get too close and be sure to watch the edges of your frame.

street at night 24mm

2. 35mm

The best genres for 35mm lenses: street photography, event photography, environmental portraits, and casual portrait photography

35mm is a classic focal length for many photojournalists and street photographers. Why? For one, the field of view requires you to get close to the action for a more immersive perspective, plus it provides plenty of useful context. On the other hand, 35mm isn’t too wide; you can use it to photograph natural-looking people, close-up details, and more.

This same philosophy applies to wedding or event photography, which is why these photographers love the 35mm focal length, especially when combined with a wide maximum aperture such as f/1.8 or even f/1.4. Note that 35mm prime lenses, like 24mm lenses, tend to be impressively cheap – so if you’re on a budget, 35mm is a great place to start.

Another nice thing about 35mm: It’s great for environmental portraits, especially those casual, spur-of-the-moment portrait opportunities that come up at family gatherings and dinner with friends. For instance, I often use 35mm to shoot portraits across the dinner table:

man laughing at a table

Any wider, and my subject’s face might suffer from feature-exaggerating perspective distortion; any narrower, and I’d have had to get out of my seat to back up for the shot.

woman with wine at a table

3. 50mm

The best genres for 50mm lenses: Street photography, full-body portrait photography, walk-around shooting

50mm primes are the lenses for the photography beginner for a whole host of reasons. In fact, if you don’t own a 50mm lens, I recommend purchasing one right now – they really are that useful.

So what makes 50mm primes so special? For one, they’re insanely cheap. You can purchase a brand-new 50mm lens for most camera systems for a little over $100. I’m not talking about shoddy, low-quality optics, either; the 50mm f/1.8 lenses that cost in the $100 USD to $200 USD range tend to offer surprisingly good performances, especially for the price.

Also, 50mm lenses produce an image that is normal (i.e., most like the image that we produce with our own eyes). Therefore, it’s often easy to “see” in 50mm.

man playing the saxophone as Santa

The 50mm lens really is a classic, and a big part of it is that the area in the frame is often just right. It’s narrow enough to create balanced compositions with ease, but still wide enough to create interest beyond your subject. That is why you will find a 50mm lens in the bags of most street photographers (and indeed, most portrait and event photographers, as well).

boat at sunset

4. 85mm

The best genres for 85mm lenses: portrait photography, event photography, and sports photography

You’ll find 85mm lenses in the bags of many wedding and portrait photographers, and for good reason: they create beautiful portraits that flatten one’s features (this is generally flattering!), plus they offer beautiful subject-background separation.

The field of view isn’t so tight that you’ll need to be outdoors to shoot with an 85mm lens, but you’ll still get a nice working distance that allows you to sneakily capture candids at weddings and family gatherings.

wedding couple coming out of a barn

That working distance is great for full-body shots when you’re on the sidelines of a sporting event, too. And 85mm lenses also offer a nice distance for photographing your kids and pets.

couple in the forest at 85mm

Of course, every focal length has its drawbacks, and 85mm is no exception. Such lenses are expensive to get ahold of, and the tighter field of view isn’t ideal for street photography or contextual portraits.

However, for serious portrait and event photographers, 85mm is a must-have.

5. 135mm

The best genres for 135mm lenses: Headshots, portrait photography, and wedding photography

When you need to get in close or you just love bokeh, a 135mm lens is a great pick – especially a 135mm prime with a wide maximum aperture.

couple on the grass

You can use a 135mm lens for details and headshots that bring your subject to life. Plus, the background separation is fantastic due to the increased telephoto compression. The flattering flattening effect (say that five times!) makes this lens great for head-and-shoulder shots, senior portraits, candids, and more. You’ll have fun shooting wide open to create magical separation between your subject and the surroundings.

group with glitter

Is there a drawback to the 135mm focal length? Of course.

You do need a lot of working room, and you also need a lot of light. Remember the 1/focal length rule for shutter speed (also known as the reciprocal rule)? Well, you wouldn’t want to shoot a 135mm lens any slower than 1/135s (without a very steady hand or a tripod). So when light or space becomes a problem, it’s nice to have an 85mm lens to fall back on.

man with dog in the forest

6. 200mm

The best genres for 200mm lenses: Sports photography, portrait photography, architectural photography, and event photography

The 200mm focal length is extremely popular, and while you won’t find many prime lenses specifically set at 200mm, there are plenty of 70-200mm lenses that get snapped up by professionals and amateurs alike.

The 200mm focal length falls within the mid-telephoto range and offers a unique perspective in a variety of scenarios. It’s great for capturing intimate shots that highlight patterns and details within a landscape – either natural or urban. The extra reach lets you zoom in and isolate specific elements such as mountains, trees, or buildings, even if you’re shooting from a large distance.

The best focal length in photography

The 200mm focal length is also great for headshots. You can use it to capture images with a stunning background bokeh, which will ensure the shots have a refined – and visually pleasing! – look.

Sports photographers also like to work at 200mm; you can use it to get close to the action without sacrificing too much of the frame. Whether you’re capturing a thrilling soccer match or a fast-paced track event, you’ll be able to freeze distant moments with precision and detail, delivering impressive shots that capture the essence of the game.

One of the biggest benefits of a 200mm focal length is its ability to produce beautiful bokeh, and that’s just one of the reasons professional portrait photographers often opt for high-quality 70-200mm f/2.8 lenses. Even the f/4 versions can create a nice blur that’ll help your subjects stand out against a crowded backdrop.

However, it’s important to note that lenses with a 200mm focal length tend to be relatively large and heavy, especially when they have wider apertures like f/2.8. Plus, they often come with a huge price tag. These factors make them a preferred choice for dedicated professionals or enthusiasts who desire top-notch quality but less popular among beginners.

7. 400mm

The best genres for 400mm lenses: Sports photography, wildlife photography, and bird photography

If you’re looking to elevate your wildlife or bird photography, the 400mm focal length is where you should set your sights. At 400mm, you can capture more elusive or distant subjects – though it’s worth mentioning that 400mm lenses are essentially useless for portrait, event, and street photography.

Many serious wildlife and sports photographers swear by the power of 400mm f/2.8 lenses, which are consistently top-of-the-line but come with a hefty price tag and are quite heavy.

The best focal length in photography

For those on a budget or who don’t want to carry around hulking f/2.8 lenses, there are some affordable zoom options that reach 400mm on the long end. These lenses offer a reasonable compromise between price and performance, making them a solid choice for hobbyist wildlife and bird photographers.

Note: While professional bird photographers might find 400mm a little too short for their needs, you can still capture stunning images of birds in your backyard or those comfortable around humans, such as ducks at the local park. Alternatively, you can capture shots that show birds small in the frame and emphasize their surroundings.

The best focal length in photography

Just remember that 400mm lenses do tend to be larger and heavier, especially those with ultra-wide apertures, and they do come at a cost. However, if you’re willing to invest in a 400mm lens, you’ll be rewarded with exceptional reach and the ability to capture remarkable images of distant subjects.

8. 500mm

The best genres for 500mm lenses: Wildlife photography and bird photography

For those wildlife and bird photography specialists, the 500mm focal length is outstanding; it offers an incredible level of zoom that’s perfect for capturing small critters with astounding detail. On the other hand, 500mm definitely isn’t the best choice if your goal is to photograph portraits, landscapes, or architecture.

Some super-telephoto zoom lenses extend up to 500mm, and these options are perfect for hobbyist bird and wildlife photographers. Professionals in the field, however, often opt for 500mm prime lenses, which are both massive and eye-wateringly expensive.

The best focal length in photography

The magnification power at 500mm allows you to get up close and personal with your subjects. It’s certainly possible to capture the intricate details and behaviors of small, elusive creatures at 500mm, though you’ll still need to brush up on your stalking skills!

It’s worth noting that working with a 500mm lens requires some skill and patience – even the slightest movement can impact image stability, and autofocusing at high magnifications is no walk in the park. Plus, due to the extensive reach and specialized nature of these lenses, they’re primarily used by photographers who are committed to very specific genres and willing to invest both financially and physically in their craft.

Which focal length should you use?

The best focal length in photography

The best focal length for you depends on a variety of factors, including the subjects you want to shoot, the type of photos you’d like to capture, your budget, and other preferences (such as size and weight). However, different genres of photography do have certain popular focal lengths, which can be a handy starting point when considering different lenses.

The best focal length for landscape photography

The best focal length in photography

Photographing stunning landscapes requires the right focal length to bring out the grandeur of nature. Here wide and ultra-wide focal lengths can work wonders, allowing you to capture sweeping compositions with plenty of foreground and background details.

Professional landscape photographers often opt for expensive zoom lenses that cover around 12mm to 24mm. However, if you’re on a budget, there are slightly narrower zoom options available, such as 16-35mm lenses. Alternatively, you might consider starting with a versatile 24mm prime lens.

Also, while wide angles dominate landscape photography, don’t underestimate the power of longer focal lengths. Working at 70mm, 135mm, and even 200mm allows you to focus on specific elements within the landscape to reveal intricate patterns and details.

The best focal length for portraits

The best focal length in photography

In portrait photography, it’s often a good idea to capture a variety of shots of each subject: more environmental (wider) images, full-body and half-body compositions, and tighter head-and-shoulders and headshots. Therefore, you’ll need to familiarize yourself with a handful of different focal lengths.

When you want to tell a broader story and incorporate the surroundings of your subject, wider focal lengths like 24mm to 35mm are the way to go; they’ll allow you to capture plenty of context, which will in turn create a sense of place and add depth to your portraits.

For capturing full-body or half-body compositions, the 50mm focal length is ideal. It strikes a perfect balance, allowing you to maintain a natural perspective while also creating solid background bokeh.

Next, the 85mm focal length works great for head-and-shoulders compositions or close-up headshots. This focal length is highly flattering, as it makes it easy to gently compress facial features and produce a pleasing background separation. Plus, with an 85mm lens, you can capture intimate details while maintaining a comfortable shooting distance.

Finally, if you’re looking to create high-quality headshots, you might want to consider longer focal lengths like 135mm or even 200mm. You can capture exquisite details and achieve stunning subject-background separation, and thanks to the longer reach, you can maintain a comfortable distance when doing close-ups.

The best focal length for street photography

There are two focal lengths that are widely favored by street photographers: 50mm and 35mm. In fact, whether you should use 50mm or 35mm for street photography is a common point of contention among street shooters!

35mm is an excellent choice for street photographers who embrace the energy and dynamism of busy urban areas. It excels at capturing candid moments and street scenes filled with activity (though you can also use it in quieter parts of the city to create compelling urban landscape shots). If you prefer a more immersive approach where you want to get up close and personal with your subjects, 35mm is the way to go. It’s perfect for capturing images that convey the vibrant atmosphere of bustling streets and can provide a sense of being there in the action.

The best focal length in photography

On the other hand, 50mm is ideal if you’re looking to isolate your subject from the surrounding environment. It’s particularly useful on crowded streets where you want to focus on a specific person or object without distractions. Additionally, the 50mm focal length provides a natural perspective – similar to what our eyes see – so it’s great for creating authentic compositions.

At the end of the day, choosing between 35mm and 50mm for street photography often boils down to personal preference and shooting style. If you enjoy capturing the bustling chaos and prefer close interactions on the streets, 35mm is an excellent go-to focal length. On the other hand, if you prefer a more focused and isolated approach where your subject stands out from the surroundings, 50mm will serve you well.

The best focal length for macro photography

The best focal length in photography

For most macro photography needs, I highly recommend investing in a dedicated macro lens. These lenses are specifically designed to deliver exceptional close-up capabilities, ensuring stunning image quality. When it comes to focal length options, macro lenses typically range from 50mm to 100mm, with a few exceptions at wider or longer ranges.

If you’re seeking versatility and a broad range of macro subjects, the sweet spot often falls within the 90-110mm focal length range. This range allows you to capture a variety of macro subjects, including small objects, plants, food, and occasional insects. With this focal length, you’ll be able to maintain a comfortable shooting distance while capturing intricate details and textures with remarkable precision.

However, if your primary focus is capturing breathtaking shots of insects in all their splendor, consider a longer focal length (around 180mm). Insect photography requires a bit more distance between you and your subjects to avoid startling them. The extra reach of a 180mm lens allows you to capture stunning close-ups of insects without disturbing their natural behavior.

The best focal length in photography: final words

Whether you’re capturing breathtaking landscapes, soul-revealing portraits, busy street shots, or close-up macro scenes, the right focal length can make all the difference. Hopefully, you now have a sense of the perfect length for your favorite types of photography, and you’re ready to head out with your camera (or purchase a new lens).

That said, the best focal length does come down to personal preference – so if you don’t like my recommendations, that’s completely okay! Go ahead and experiment until you find a focal length that works for you.

Now over to you:

Which focal lengths do you like best? Share your thoughts in the comments below!

The post What Is the Best Focal Length? A Comprehensive Guide appeared first on Digital Photography School. It was authored by Jason Checkla.


from Digital Photography School https://ift.tt/KH7MlQX